[phpBB Debug] PHP Notice: in file /viewtopic.php on line 988: date(): It is not safe to rely on the system's timezone settings. You are *required* to use the date.timezone setting or the date_default_timezone_set() function. In case you used any of those methods and you are still getting this warning, you most likely misspelled the timezone identifier. We selected 'Europe/Moscow' for 'MSD/4.0/DST' instead
[phpBB Debug] PHP Notice: in file /viewtopic.php on line 988: getdate(): It is not safe to rely on the system's timezone settings. You are *required* to use the date.timezone setting or the date_default_timezone_set() function. In case you used any of those methods and you are still getting this warning, you most likely misspelled the timezone identifier. We selected 'Europe/Moscow' for 'MSD/4.0/DST' instead
SolaraGuy.com • View topic - Remind me again....
Talk about aftermarket Toyota Solara Gen 1-1.5 upgrades.

Remind me again....

Remind me again....

Postby ChrissyD123 » Sun Sep 06, 2009 8:44 pm

How to tint tail lights? I heard people talking about an oven being involved. Is that the ONLY possible way to attempt tinting tail lights? I dont wanna go TOO dark, Just dark enough to where it looks great.

I would appreciate it if you could give steps start to finish

THANKS!
</SolaraGirl>
Image
{15inch JL sub w/ 1000 JL Watt Amp.... Stock engine, but clean Lara}
User avatar
ChrissyD123
Regular SolaraGuy Member
 
Posts: 118
Joined: Mon Mar 09, 2009 7:02 am
Location: KANSAS

Postby 99BlackSandv6 » Sun Sep 06, 2009 8:48 pm

No oven needed, thats the headlights. All you need is VHT Niteshades and some tape. You don't have to go real dark just a couple coats.
Trust me, I'm a technician.
Image
User avatar
99BlackSandv6
SolaraGuy Street Racer
 
Posts: 1973
Joined: Sat Sep 27, 2008 4:37 pm
Location: P-burg, WV

Postby ChrissyD123 » Sun Sep 06, 2009 8:49 pm

99BlackSandv6 wrote:No oven needed, thats the headlights. All you need is VHT Niteshades and some tape. You don't have to go real dark just a couple coats.


okay nice... And removing them? I looked in my truck and saw a sh!t ton of nuts and bolts. Is that the access to removing the lights?
</SolaraGirl>
Image
{15inch JL sub w/ 1000 JL Watt Amp.... Stock engine, but clean Lara}
User avatar
ChrissyD123
Regular SolaraGuy Member
 
Posts: 118
Joined: Mon Mar 09, 2009 7:02 am
Location: KANSAS

Postby Ilovemylara » Sun Sep 06, 2009 9:17 pm

I didnt need an oven for mine. You will need :
1000 grit wet/dry sandpaper
rubbing alchohol or mineral spirits
One can of VHT niteshades (autozone carries it)
Lots of paper towels
Polishing compound
KRYLON clear coat (this is the best you can get, other than professional)
a couple terry cloths (rags)
This will take about 4 hours+ depending on how fast you work, and the temperature of the atmosphere where they are drying (this is where the oven is ideal becuase it dries them alot faster)

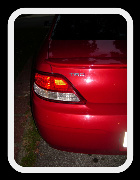
First you will need to remove the tailights from your car. Should be four 10mm nuts, you will need to remove a plastic cover to get at them. Once you have removed the tailights, remove the bulbs, wash the tailights in soapy water (not hand soap, dishwashing soap, it removes grease), and dry them. Then you will soak your 1000 grit wetsand paper in water, and begin lightly sanding the tails. try to keep a constant motion, and keep the paper wet. This step is critical, as the surface need to be rough for the tint spray to adhere. Once the tailights are a milky red color, get your rubbing alchohol or mineral spirits and wipe the taillights down with a damped paper towel. Do this a few times to remove any dust particles leftover from sanding. Take the tailights outside (if you arent outside already) and begin spraying them. Do a VERY LIGHT first coat, this is called the TACK coat, and it is essential if you want the tint to stick. After giving the initial coat 5-10 mins to dry you can do a few more heavier coats, just make sure to keep the tails light enough for light to pass through, not sure about your local laws... When you have finished painting the tails, and they have had adequate time to dry, you need to wetsand them again to get rid of any orangepeel, and to prepare for clearcoat. Clearcoating them is pretty much the same as spraying the tint. Just use your head. Once again when the clear coat has finished drying you will need to wetsand them some more, as there will most likely be a substancial amount of orangepeel. Heres where your polishing coumpund comes into play: Put a dap (about the size of a quarter) on a terry cloth and begin working it into the freshly sanded clear coat. Starting to look really nice eh? Do this a couple more times to remove any swirl marks from the previous wetsanding, and your tailights will look like a mirror.
User avatar
Ilovemylara
SolaraGuy Street Racer
 
Posts: 1264
Joined: Tue Jul 22, 2008 12:41 am
Location: Chevrolet, USA

Postby 99BlackSandv6 » Sun Sep 06, 2009 10:32 pm

:o

That is not all necessary, but it is a very good way to do it. Props on the write up. All you really have to do to make it look good is remove the light, clean it up and follow the directions on the can. If you are good with a can of spray paint you shouldn't even need to wet sand. I tinted my corners with Niteshades and the paint leveled very nicely with a great glossy shine. I only did the tack coat and two finish coats.
Trust me, I'm a technician.
Image
User avatar
99BlackSandv6
SolaraGuy Street Racer
 
Posts: 1973
Joined: Sat Sep 27, 2008 4:37 pm
Location: P-burg, WV

Postby Ilovemylara » Sun Sep 06, 2009 10:37 pm

99BlackSandv6 wrote::o

That is not all necessary, but it is a very good way to do it. Props on the write up. All you really have to do to make it look good is remove the light, clean it up and follow the directions on the can. If you are good with a can of spray paint you shouldn't even need to wet sand. I tinted my corners with Niteshades and the paint leveled very nicely with a great glossy shine. I only did the tack coat and two finish coats.


true, it is alot of steps, but In the end, it will hold up longer than without clear coat, My corner lights were done without clearcoat and the stupid UV rays have made them look like crap :/ Plus with a proper wetsand and polish method, they come out looking like a mirror and smooth as GLASS.
User avatar
Ilovemylara
SolaraGuy Street Racer
 
Posts: 1264
Joined: Tue Jul 22, 2008 12:41 am
Location: Chevrolet, USA

Postby 99BlackSandv6 » Sun Sep 06, 2009 10:50 pm

Yeah man, I was just saying that not all the steps are necessary, but what you did is a great process. I've seen the pictures of your car and the job you did on the lights looks great. I was just giving the abbreviated version.
Trust me, I'm a technician.
Image
User avatar
99BlackSandv6
SolaraGuy Street Racer
 
Posts: 1973
Joined: Sat Sep 27, 2008 4:37 pm
Location: P-burg, WV

Postby Ilovemylara » Sun Sep 06, 2009 11:20 pm

99BlackSandv6 wrote:Yeah man, I was just saying that not all the steps are necessary, but what you did is a great process. I've seen the pictures of your car and the job you did on the lights looks great. I was just giving the abbreviated version.

No problem. thanks man! :)
User avatar
Ilovemylara
SolaraGuy Street Racer
 
Posts: 1264
Joined: Tue Jul 22, 2008 12:41 am
Location: Chevrolet, USA

Return to Aftermarket Gen1 and 1.5

Who is online

Users browsing this forum: No registered users and 14 guests