DIY: OBX Headers Installation
![]() by TRDSleeper » Sun May 31, 2009 1:33 pm
by TRDSleeper » Sun May 31, 2009 1:33 pm
Hey Everyone. Here is my tutorial for installing the OBX or JP Performance 1MZ-FE Header System. Before I start, I’ll mention the usual disclaimer: This tutorial is meant to assist fellow SG members in the installation of exhaust headers. It should be used only as a general guide and I shall not be held responsible for anything that might go wrong before, during, or after the installation. You might or might not need to use more tools than I did and some steps do not need to be in the exact order.
The main reason I made this tutorial is to prove that you CAN install the headers in your own garage without removing any major parts. I took 16 hours total to install them but I hope this tutorial will help you do it faster than me. It also helps if you have small hands and skinny arms to get into tight areas when needed. Enjoy!
List of Tools Used:
1. 3/8” drive ratcheting socket wrench
2. 10mm, 12mm, 14mm, & 17mm sockets for the 3/8” drive
3. 6” and 3” extensions for the 3/8” drive
4. ½” to 3/8” drive adapter
5. ¼” drive ratcheting socket wrench with 4” extension
6. 10mm socket for the ¼” drive
7. 10mm & 14mm combination wrenches
8. 14mm ratcheting flex-head combination wrench
9. 22mm (7/8”) offset oxygen sensor wrench
10. Pliers
11. ½” drive breaker bar
Other tools not pictured:
1. Penetrating spray
2. Jack
3. Jack stands
4. A creeper
5. Flashlight or any light source
6. Anti-seize compound

First step: Use the jack to raise the car up and put it on jack stands.

Remove the air intake. I don’t think I need to go into much detail about this since everyone here is pretty fluent with cars.

Remove the stock Y-pipe. Sorry, I forgot to take a pic of this step but it’s easy. Spray penetrating oil on all of the nuts and bolts first. Then remove the 2 nuts on the bottom of each header and the 2 nuts & bolts in the rear of the Y-pipe with the 14mm sockets. Unbolt the rubber hanger with the 12mm socket.
Remove the remaining Y-pipe bracket (circled) so that the new Y-pipe will have clearance. I forgot if I used 12 or 14mm sockets but you should be able to figure it out.

Use the ¼” drive socket wrench & 10mm socket to remove the four nuts on the stock EGR tube.

Slide the offset oxygen sensor wrench over the rear A/F sensor.

Then from inside the engine bay, use the breaker bar with adapter to loosen the rear sensor and unscrew it. (I tried to remove the sensor from underneath but couldn’t get much torque so inside the engine bay is a better idea.)

From underneath the car, find the 12mm nut on top of the car axle that is holding the bracket on a power steering line.

Remove the nut and lift up the bracket. This allows clearance to access the far right nut on the rear header.

Assemble the 3/8” drive socket wrench with the 6” and 3” extensions and 14mm socket as shown.

Then use it to remove the top three nuts on the rear header.

Take off the bottom three nuts with the 14mm ratcheting flex-head wrench. (The flexing head allows you to move around more and apply torque at better angles than the regular combination wrench.)

Remove the bolt at the bracket holding the rear header. Again, I forgot if it’s 12 or 14mm.

After everything is unbolted, simply drop the rear headers down the opening. (It seems like Toyota engineers thought about the header design really well since it was easy to take out.)

Remove the old gasket and unclip the A/F sensor wire from the bracket because the new header will actually relocated the sensor to a lower position so if you don’t unclip it then it will be very difficult to install.

Now for the front headers. Remove the top three nuts with a 14mm socket. Then use the 14mm ratcheting flex-head to remove the bottom three.

Again, use the offset sensor wrench to take off the front A/F sensor.

Unclip the A/F sensor wire from the bracket. This is because the new header will again relocate the sensor to a lower position than stock and will make the wires too tight.

Take off the old gasket and apply anti-seize compound on the lugs.

Do the same for the rear header lugs and install a new gasket. Note: the OEM metal gasket has a side “A” and side “B” imprinted on it. Make sure side “A” faces you.

Next, we’ll be working with the rear OBX headers first since it’s more difficult to install.
Find and remove the 10mm bolt from the bracket where you unclipped the rear A/F sensor previously. It is connected to the metal power steering hose traveling upward. This will allow you to have some room to install the rear headers later on.

Then unbolt the EGR tube. There are two nuts on the top of the tube connected to the intake plenum that is not pictured. Remove those as well. Again, this is to have more room to install the new header.

Then from inside the engine bay, lower the new header from top down in the orientation as shown. This is why the air intake was removed in the beginning, to make room for us to drop the header in.


Underneath the car, slide the header all the way to the right as far as you can and pull the bottom of the header down through the opening between the subframe and drive axle and you should be able to install the header.

Once the header is on, use your 3/8” drive socket wrench with the 6” extensions to tighten the far right nut.

For the other 2 nuts on the top, use the regular 14mm combination wrench to tighten them.

Use the 14mm ratcheting flex-head wrench to install the 3 bottom nuts.

Install the new EGR tube. However, OBX did not give the 2 small 10mm bolts needed to bolt it on so I had to buy some from the local car parts store. I used flanged bolts size M6-1.00 x 25 which are the exact length needed.


Tighten the new bolts with the OEM nuts.

Apply anti-seize compound to the A/F sensor and screw it in.

Tighten with the offset sensor wrench and 3/8” drive wrench.

Flip down the power steering hose bracket you removed earlier.

And reinstall the 12mm bolt.

Reinstall the 10mm bolt on the bracket holding vertical metal power steering hose that you removed earlier.

Put back the EGR tube and tighten the 2 nuts on top of the tube as well as the 2 on the bottom.

Now install the front header. It is self explanatory so I don’t think I need to go into details.

Raise the Y-pipe up to align it to the headers and the rest of the exhaust system. I used some boxes to help hold it up since it’s heavy and difficult to align.

I lined up one bolt on each header before I install the rest of the bolts. This is something you have to play around with. Remember to install the OBX gaskets too. I actually spent nearly 4 hours just trying to install the Y-pipe. I don’t know if it’s because of OBX poor quality control or just car to car variances but the flanges had a very difficult time lining up.

Next use 14mm wrenches to tighten the 2 nuts and bolts on the rear flange.

Then put back the rubber hanging bracket for the Y-pipe. My hanger moved the bracket almost an inch away from the subframe and made it impossible to install so the second pic shows my solution to the problem.


Put back the air intake.

Use the jack to raise the car, remove the jack stands, then lower the car to the ground.
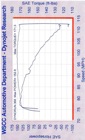
Voila! You have done the impossible and installed the header system without removing any major parts. Enjoy the new power and sound! After the headers heat up, they will actually change from a polished color to a golden color. Looks pretty damn cool to me.

The main reason I made this tutorial is to prove that you CAN install the headers in your own garage without removing any major parts. I took 16 hours total to install them but I hope this tutorial will help you do it faster than me. It also helps if you have small hands and skinny arms to get into tight areas when needed. Enjoy!
List of Tools Used:
1. 3/8” drive ratcheting socket wrench
2. 10mm, 12mm, 14mm, & 17mm sockets for the 3/8” drive
3. 6” and 3” extensions for the 3/8” drive
4. ½” to 3/8” drive adapter
5. ¼” drive ratcheting socket wrench with 4” extension
6. 10mm socket for the ¼” drive
7. 10mm & 14mm combination wrenches
8. 14mm ratcheting flex-head combination wrench
9. 22mm (7/8”) offset oxygen sensor wrench
10. Pliers
11. ½” drive breaker bar
Other tools not pictured:
1. Penetrating spray
2. Jack
3. Jack stands
4. A creeper
5. Flashlight or any light source
6. Anti-seize compound
First step: Use the jack to raise the car up and put it on jack stands.
Remove the air intake. I don’t think I need to go into much detail about this since everyone here is pretty fluent with cars.
Remove the stock Y-pipe. Sorry, I forgot to take a pic of this step but it’s easy. Spray penetrating oil on all of the nuts and bolts first. Then remove the 2 nuts on the bottom of each header and the 2 nuts & bolts in the rear of the Y-pipe with the 14mm sockets. Unbolt the rubber hanger with the 12mm socket.
Remove the remaining Y-pipe bracket (circled) so that the new Y-pipe will have clearance. I forgot if I used 12 or 14mm sockets but you should be able to figure it out.
Use the ¼” drive socket wrench & 10mm socket to remove the four nuts on the stock EGR tube.
Slide the offset oxygen sensor wrench over the rear A/F sensor.
Then from inside the engine bay, use the breaker bar with adapter to loosen the rear sensor and unscrew it. (I tried to remove the sensor from underneath but couldn’t get much torque so inside the engine bay is a better idea.)
From underneath the car, find the 12mm nut on top of the car axle that is holding the bracket on a power steering line.
Remove the nut and lift up the bracket. This allows clearance to access the far right nut on the rear header.
Assemble the 3/8” drive socket wrench with the 6” and 3” extensions and 14mm socket as shown.
Then use it to remove the top three nuts on the rear header.
Take off the bottom three nuts with the 14mm ratcheting flex-head wrench. (The flexing head allows you to move around more and apply torque at better angles than the regular combination wrench.)
Remove the bolt at the bracket holding the rear header. Again, I forgot if it’s 12 or 14mm.
After everything is unbolted, simply drop the rear headers down the opening. (It seems like Toyota engineers thought about the header design really well since it was easy to take out.)
Remove the old gasket and unclip the A/F sensor wire from the bracket because the new header will actually relocated the sensor to a lower position so if you don’t unclip it then it will be very difficult to install.
Now for the front headers. Remove the top three nuts with a 14mm socket. Then use the 14mm ratcheting flex-head to remove the bottom three.
Again, use the offset sensor wrench to take off the front A/F sensor.
Unclip the A/F sensor wire from the bracket. This is because the new header will again relocate the sensor to a lower position than stock and will make the wires too tight.
Take off the old gasket and apply anti-seize compound on the lugs.
Do the same for the rear header lugs and install a new gasket. Note: the OEM metal gasket has a side “A” and side “B” imprinted on it. Make sure side “A” faces you.
Next, we’ll be working with the rear OBX headers first since it’s more difficult to install.
Find and remove the 10mm bolt from the bracket where you unclipped the rear A/F sensor previously. It is connected to the metal power steering hose traveling upward. This will allow you to have some room to install the rear headers later on.
Then unbolt the EGR tube. There are two nuts on the top of the tube connected to the intake plenum that is not pictured. Remove those as well. Again, this is to have more room to install the new header.
Then from inside the engine bay, lower the new header from top down in the orientation as shown. This is why the air intake was removed in the beginning, to make room for us to drop the header in.
Underneath the car, slide the header all the way to the right as far as you can and pull the bottom of the header down through the opening between the subframe and drive axle and you should be able to install the header.
Once the header is on, use your 3/8” drive socket wrench with the 6” extensions to tighten the far right nut.
For the other 2 nuts on the top, use the regular 14mm combination wrench to tighten them.
Use the 14mm ratcheting flex-head wrench to install the 3 bottom nuts.
Install the new EGR tube. However, OBX did not give the 2 small 10mm bolts needed to bolt it on so I had to buy some from the local car parts store. I used flanged bolts size M6-1.00 x 25 which are the exact length needed.
Tighten the new bolts with the OEM nuts.
Apply anti-seize compound to the A/F sensor and screw it in.
Tighten with the offset sensor wrench and 3/8” drive wrench.
Flip down the power steering hose bracket you removed earlier.
And reinstall the 12mm bolt.
Reinstall the 10mm bolt on the bracket holding vertical metal power steering hose that you removed earlier.
Put back the EGR tube and tighten the 2 nuts on top of the tube as well as the 2 on the bottom.
Now install the front header. It is self explanatory so I don’t think I need to go into details.
Raise the Y-pipe up to align it to the headers and the rest of the exhaust system. I used some boxes to help hold it up since it’s heavy and difficult to align.
I lined up one bolt on each header before I install the rest of the bolts. This is something you have to play around with. Remember to install the OBX gaskets too. I actually spent nearly 4 hours just trying to install the Y-pipe. I don’t know if it’s because of OBX poor quality control or just car to car variances but the flanges had a very difficult time lining up.
Next use 14mm wrenches to tighten the 2 nuts and bolts on the rear flange.
Then put back the rubber hanging bracket for the Y-pipe. My hanger moved the bracket almost an inch away from the subframe and made it impossible to install so the second pic shows my solution to the problem.
Put back the air intake.
Use the jack to raise the car, remove the jack stands, then lower the car to the ground.
Voila! You have done the impossible and installed the header system without removing any major parts. Enjoy the new power and sound! After the headers heat up, they will actually change from a polished color to a golden color. Looks pretty damn cool to me.
-

TRDSleeper - Regular SolaraGuy Member

- Posts: 181
- Joined: Tue Jan 29, 2008 3:54 pm
- Location: Sacramento, CA