Custom Solara Door Sills
![]() by DaveD » Fri Dec 05, 2003 12:15 pm
by DaveD » Fri Dec 05, 2003 12:15 pm
Due to popular demand, here's the recipe:
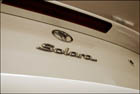
You will need to get a die cut vinyl Solara logo if you want them to look like mine. You could use a TRD or you car club logo. Whatever you want.
These stickers can be custom made at sign shops. The guy that does them for me only charges $1.00 - $5.00 each depending on size. I paid 10.00 bucks for the two Solara stickers he cut for me for this project.
You must have camera ready artwork to have these cut. If you need a camera ready Solara or TRD logo I can e-mail you one. Otherwise you're on your own.
I had Solara logos cut at about eight inches long for this project. If you wanted TRD logos you will need to determine how big you want them in relation to the door sills. I didn't do TRD logos because I alredy have enough TRD logos on my car and I think it's ricey to have too many TRD logos on your vehicle, but beauty is in the eye of the beholder. I wanted my sills to look like those on the Porsches and Mercedes. So I used the brushed aluminum and titanium look. More on that later.
Go to the local sheet metal shop and purchase two strips of aluminum
36" long X 2 1/4" wide. Use approx. 16Ga. thickness metal. You may want to compare different thicknesses, but be sure to use thick enough metal to prevent warping or bending as aluminum is soft. You want the pieces to be free of any deep scratches or gouges. You can use stainless steel, but it is very hard and is difficult to cut and shape. It does look very good although the aluminum looks good also. I used aluminum for mine.
Use a Dremel tool with a spiral cutter or a jewler's saw (a coping saw will do, so will a jig or sabre saw if you support the metal well) to cut the square corners of the metal in an nice smooth arc. I shaped mine to match the ends of the stock sills. You will then need to file and sand the ends (arcs) so they have a nice smooth finish ( I used a bench mounted belt & disc sander).
Take 200 or finer grit emery paper and give the entire sill a lightly sanded appearance. You want this finish to be done in the same linear direction. I finished mine lengthwise. This will end up being the finish of your logo and any other graphics you use so you want the sanded (brushed) finish to look consistent and in one direction.
Wash the sill well (your hands too as you will end up painting the sill and you want good adhesion). Measure and mark the center of the sill taking care not to make a mark that will be obvious after completion. I used a pencil to make a small + at the center.
Apply the logo of your choice taking care to get it as close to center as possible. I then took 1" wide masking tape and laid it out on either side of the logo and marked and cut (with a sharp Exacto knife) 1/4" stripes. Be careful when you cut these with the Exacto knife that you don't press down too hard or you will cut into the metal and that won't look very good. You can use your imagination for this part. You could do flames, lightning bolts whatever. I was trying for a subdued sport look.
Make sure the logo and any masked areas are firmly pressed down, then wipe down the entire sill with a paper towel dampened with isopropyl alcohol. Do not saturate the towel or the sill with alcohol. Use just enough alcohol to dampen the towel to remove any residual grease or oil from your handling the sill while masking. Once that's done you're ready for painting.
I used a dark grey metallic auto paint available at walmart. I forgot the brand name, but you could use DupliColor or any of the brands and use any color you wanted to. I used the dark grey metallic because it looks like titanium against the brushed aluminum and it matches my gauge bezel and shifter surround. I've tried this masking technique with that new DupliColor Anodized Finish paint and it doesn't work very good. The paint tends to lift off when you remove the masking. You can give it a try if you want the anodized look. Be sure to let it dry for several hours though
Take your time while you paint these, you don't want any runs or drips. Do light coats. I only did 2 light coats and then carefully, I repeat carefully removed the masking and the logo sticker. I can't state how careful you need to be with this stage of the process. You can easily scratch the paint finish if you are not patient. If you scratch the fininsh, you're either stuck with it or you have to clean the paint off with acetone and start all over again. You can remove the masking as early as 15 minutes after you paint these, but be sure to check the drying time on the brand of paint you use.
I finished this all up with a couple of coats of clearcoat (make sure you use a compatible brand.) and used double sided moulding and emblem mounting tape to mount these in the door opening, replacing the stock door sills.
That's about it! Let me know if you have questions and good Luck!
Check out the old guy's Solara @
http://home.onemain.com/~foxcroft/index.html
- DaveD